What I'm working on... "Dancing In The Street" A collection of offbeat basics. Mix & match tees, shorts & hoodies for boys and girls! Comfy knit playwear with Daydream Believers style!
Here’s a sneak peek…

SNEAK PEEK: THE DANCING IN THE STREET COLLECTION
TUTORIAL DIY TWIRLY PATCHWORK MAXI SKIRT
TGIF! Today wraps up Spring Skirts Week and we’re going to finish with a bang!
Today’s tutorial is for The Festival Skirt - a full, twirly maxi skirt with patchwork details and a ruffle hem!
Are you ready to create a one of a kind, stylish, fabulous, maxi skirt for you girl? Let’s do it!
MATERIALS
1 1/2 yards of fabric
1 piece of 2-inch wide elastic, that measures 2 inches smaller than your girl’s waist
CUTTING INSTRUCTIONS
First cut out your pieces.
| SIZE | 2 | 3 | 4 | 5 | 6 | 7 | 8 |
| Tier 1 (Cut 2) | 5” x 15” | 5” x 16” | 6” x 16” | 6.5” x 16” | 7” x 17” | 7.5” x 17” | 8” x 18” |
| Tier 2 (Cut 8 Squares) | 5x5 | 5.5x5.5” | 6x6” | 6.5”x6.5” | 7”x7” | 7.5”x7.5” | 8x8” |
| Tier 3 (Cut 4) | 8.5” x 38” | 9”x40” | 10.5”x40 | 11.5”x40 | 12.5”x40 | 13.5”x42” | 13.5”x42” |
Before you begin constructing The Festival Skirt you should have cut:
-Two Tier-1Skirt Panels
-Eight Tier-2 Skirt Pieces
-Four Tier-3 Skirt Pieces
- One piece of elastic
CONSTRUCTION
1. We’re going to start construction by creating three tubes (one for each tier) Grab your Tier-3 pieces, sew them together to create one loooong piece, then pin and sew along the short sides, using a 1/2” seam allowance, to create a tube. Finish the side seams in your preferred method.
*Quick Note* I finish my seams with a serger, this is not necessary! Other options for finishing your seams are to use an inexpensive pair of pinking shears and simply cut along the raw edge, or to sew over the raw edge with a tight zigzag stitch, so the right hand swing of the needle falls JUST off the edge.
2. Hem the skirt by pressing under the bottom edge 1/4” to the wrong side and then another 1/4”. Stitch close to the inner folded edge with a short, straight stitch. Set Tier-3 aside.
3. Next, you will construct Tier-2, your patchwork tier. Take your squares and arrange them in a pattern that appeals to you. Then, sew the squares together to create one long row. Once all of the squares have been sewn together, sew along the short sides, using a 1/2” seam allowance. Be sure to finish all seams.
4. We’re going to assemble the skirt from the bottom up. Beginning with Tier-3, sew gathering stitches to the tier’s top edge, using the method of your choice. (Read more about gathering fabric, here) Match the tier’s gathered edge to the bottom edge of Tier-2 (right sides facing) and gather to fit securing in place with pins.
4. Sew Tier-3 to Tier-2 with a 1/2” seam allowance. Finish and press the seam toward Tier-2. Topstitch right above the seam along the bottom edge of Tier-2 to hold the seam allowance in place.
5. Next, you will create your Tier-1 tube by sewing along the short sides, using a 1/2” seam allowance and finishing the side seams.
6. Now you will attach Tier-2 to Tier-1. Sew gathering stitches to the top edge of Tier-2, match the tiers gathered edge to the bottom edge of Tier-1 (right sides facing) and gather to fit securing in place with pins.
6. Sew Tier-2 to Tier-1 with a 1/2” seam allowance. Finish and press the seam toward Tier-1. Topstitch right above the seam along the bottom edge of Tier-1 to hold the seam allowance in place.
7. To create your waistband, start by finishing the edges of the elastic, serge each edge or zig-zag over the short edge of the elastic (this will prevent the elastic from fraying). Next, fold the elastic in half and sew it together at the short side, using a 1/2” seam allowance.
8. Almost finished! You just need to attach your elastic waistband to your skirt. Do this by pinning the bottom of the elastic to the top of Tier-1. You will want the elastic to sits about 1/4 of an inch over the top of the skirt. I like to start pinning by matching the center back of the elastic with the center back of the skirt, then matching the center front of the elastic with the center front of the skirt, then pinning the elastic down on both sides. Then I continue to stretch the fabric, cutting the gaps in half. Now let’s sew it on! You will need to gently stretch the elastic as you go, so that it’s taut with the fabric. Sew with a zig-zag stitch. Use both hands as you go, pulling it straight in the front and the back and sew from pin to pin, stretching it bits at a time.
That’s it! One fabulous, patchwork maxi skirt in just 8 steps!
This tutorial is for personal use only. Please do not sell pieces created with this tutorial for profit.
Please DO use this tutorial and make sweet skirts for your favorite girls!
If you use this tutorial to create skirts for your girl - I would LOVE to feature YOU on the blog!
Please share a picture on the DB Facebook Page or #daydreambelieversdesigns on Insta & Twitter
TUTORIAL: DIY TIERED TWIRL SKIRT
Welcome back to Spring Skirts Week! Your easy-to-follow DIY guide to creating a unique Spring wardrobe!
Today’s tutorial is for The Party Skirt! Featuring three tiers of slightly gathered fabric; this skirt is twirly and floaty. Make one using just one fabric (like I did here) or mix and match fabrics for a fun boutique look!
MATERIALS
1 yard of fabric for skirt
2/3 yard of 1/2”-wide nonroll elastic
CUTTING INSTRUCTIONS
First cut out your pieces. (Join 2 strips together to make the length if necessary)
| SIZE | 2 | 3 | 4 | 5 | 6 | 7 | 8 |
| Tier 1 | 5.5” x 36.5” | 6” x 37” | 6.5” x 37.5” | 7” x 38” | 7.5” x 38.5” | 8” x 39” | 8.25” x 40” |
| Tier 2 | 5.5” x 46.5” | 6” x 47” | 6.5” x 47.5” | 7” x 48” | 7.5” x 48.5” | 8” x 49” | 8.25” x 50” |
| Tier 3 | 5.5” x 56.5” | 6” x 57” | 6.5” x 57.5” | 7” x 58” | 7.5” x 58.5” | 8” x 59” | 8.25” x 60” |
| Elastic | 15” | 16” | 17” | 18” | 18.5” | 19” | 20” |
Before you begin constructing The Party Skirt you should have cut:
-One Tier-1Skirt Panel
-Two Tier-2 Skirt Pieces
-Two Tier-3 Skirt Pieces
- One piece of elastic
CONSTRUCTION
This sweet skirts comes together SO quickly! Let’s get right to it!
1. We’re going to start construction by creating three tubes (one for each tier) Grab your Tier-1 piece, pin and sew along the short sides, using a 1/2” seam allowance. Finish the side seams in your preferred method, and set aside. Repeat this step for Tier-2 and Tier-3.
*Quick Note* I finish my seams with a serger, this is not necessary! Other options for finishing your seams are to use an inexpensive pair of pinking shears and simply cut along the raw edge, or to sew over the raw edge with a tight zigzag stitch, so the right hand swing of the needle falls JUST off the edge.
2. Hem the skirt by pressing under the bottom edge 1/4” to the wrong side and then another 1/4”. Stitch close to the inner folded edge with a short, straight stitch. For visual interest, I added two additional rows of stitches.
3. We’re going to assemble the skirt from the bottom up. Beginning with Tier-3, sew gathering stitches to the tier’s top edge, using the method of your choice. (Read more about gathering fabric, here) Match the tier’s gathered edge to the bottom edge of Tier-2 (right sides facing) and gather to fit securing in place with pins.
4. Sew Tier-3 to Tier-2 with a 1/2” seam allowance. Finish and press the seam toward Tier-2. Topstitch right above the seam along the bottom edge of Tier-2 to hold the seam allowance in place.
5. Next, sew gathering stitches to the top edge of Tier-2, match the tiers gathered edge to the bottom edge of Tier-1 (right sides facing) and gather to fit securing in place with pins.
6. Sew Tier-2 to Tier-1 with a 1/2” seam allowance. Finish and press the seam toward Tier-1. Topstitch right above the seam along the bottom edge of Tier-1 to hold the seam allowance in place.
7. To create your waistband, start by folding the top edge of the skirt 1/4” to the wrong side of the fabric and press. Next fold the edge another 1” again to the wrong side of the fabric, and press again. With the skirt wrong side out, stitch close to the bottom edge of the waistband all the way around, leaving a 1” opening at the center of the back (to slip in your elastic). Be sure to backstitch at the beginning and end of your stitching.
8. Attach a safety pin to one end of the elastic and guide it through the waistband casing. Once you get back to the opening, remove the safety pin and sew the elastic ends together to make a loop. Overlap the elastic ends 1/2” and use a zigzag stitch to secure them. Finish by sewing the gap closed.
This tutorial is for personal use only. Please do not sell pieces created with this tutorial for profit.
Please DO use this tutorial and make sweet skirts for your favorite girls!
If you use this tutorial to create skirts for your girl - I would LOVE to feature YOU on the blog!
Please share a picture on the DB Facebook Page or #daydreambelieversdesigns on Insta & Twitter
TUTORIAL MAKE A PLEATED TWIRL SKIRT
Welcome back to Spring Skirts Week! Your easy-to-follow DIY guide to creating a unique Spring wardrobe!
Today’s tutorial is for The Country Club Skirt! This little skirt features a classic waistband and lots of sweet pleats! This style looks so complex, but it is really a simple way to create a skirt with lots of flair!
MATERIALS
1 yard fabric for skirt
2/3 yard of 1/2”-wide nonroll elastic
CUTTING INSTRUCTIONS
First cut out your pieces.
| SIZE | 2 | 3 | 4 | 5 | 6 | 7 | 8 |
| SKIRT PANELS (Cut 2) | 13” L x 29” W | 13.5” L x 30” W | 14.5” L x 31.5” W | 15” L x 33” W | 15.75” L x 35” W | 17” L x 36.5” W | 18.75” L x 38” W |
| Waistband (Cut 2) | 3” x 14.5” | 3” x 15” | 3” x 16” | 3” x 16.5” | 3” x 17.5” | 3” x 18” | 3” x 18.5” |
| Elastic | 15” | 16” | 17” | 18” | 18.5” | 19” | 20” |
Before you begin constructing a “Playground Skirt” you should have cut:
-Two Skirt Panels
-Two Waistband Pieces
-One piece of elastic
CONSTRUCTION
Let’s start with the waistband.
1. Take each waistband strip and press it in half, lengthwise. Then, open up each strip, and place the two waistband pieces right sides together and sew along the short sides, using a 1/2” seam allowance. Finish the seams and press. Fold the waistband in half, lengthwise. Set the band aside.
Next, you will sew together your skirt panels and hem your skirt!
2. Simply match the side edges of the skirt back to the skirt front, right sides together. Pin and sew along the short sides, using a 1/2” seam allowance. Finish the side seams in your preferred method, and set aside.
*Quick Note* I finish my seams with a serger, this is not necessary! Other options for finishing your seams are to use an inexpensive pair of pinking shears and simply cut along the raw edge, or to sew over the raw edge with a tight zigzag stitch, so the right hand swing of the needle falls JUST off the edge.
3. Hem the skirt by pressing under the bottom edge 1/4” to the wrong side and then another 1/4”. Stitch close to the inner folded edge with a short, straight stitch.
Now it’s time to create your pleats! The key to creating perfect pleats is all in the pressing! Before you start, make sure your iron is HOT! I use lots of water and lots of steam when pleating a skirt! Pleating requires a bit more precision than gathering does; but the final product looks so gorgeous, it is worth the extra effort!
Here we go!
4. Grab a ruler and piece of chalk or washable fabric marker. Starting at the left seam, make one mark. Then measure three inches and make a second mark. Then measure three inches and make a third mark. Continue marking your fabric, every three inches, across your entire skirt panel. Like this:
5. Once you have made a mark every 3 inches, across the entire skirt panel, you’re ready to start pleating!
Grab your fabric at point 1 and fold it over to the second point (ie 3 inches away). Pin the fabric in place at the 3 inch mark and press, press, press - creating a nice, crisp pleat! To continue, simply pick up your fabric at the next point (6 inches in) and fold it over the following point (9 inches in), pin the fabric in place and press. Continue the pattern of picking up fabric at one point and folding it to the next point around the panel.
6. Sew your pleats in place by sewing a long, straight, basting stitch 1/2” below the top edge of the panel.
7. Attach the waistband to the skirt panel. Turn waistband upside down and wrong side out. Align lower edge of the waistband with the upper edge of the skirt. Match the side seams, front center and back center; secure the waistband to the skirt panel with a few pins.
8. Beginning at one side seam, sew the waistband in place with a 1/2” seam allowance, leaving a one-inch opening for inserting the elastic.
9. Attach a safety pin to one end of the elastic and guide it through the waistband casing. Overlap the elastic ends 1/2” and use a zigzag stitch to secure them.
10. Finish the seam using your preferred method and press the seam upwards toward the waistband. Topstitch the seam in place, give the skirt to your girl and watch the twirling begin!
This tutorial is for personal use only. Please do not sell pieces created with this tutorial for profit.
Please DO use this tutorial and make sweet skirts for your favorite girls!
If you use this tutorial to create skirts for your girl - I would LOVE to feature YOU on the blog!
Please share a picture on the DB Facebook Page or #daydreambelieversdesigns on Insta & Twitter
TUTORIAL DIY BOUTIQUE TWIRL SKIRT AND APRON VARIATION
Every girl needs a good twirl skirt. Today I’m sharing an easy to follow tutorial for creating a beautiful twirl skirt. Dress it up or dress it down, this pattern can be used to create everything from play skirts to fancy apparel. I’m also including a quick apron variation, for a little extra flair!
Introducing,
*and*
This pattern will soon be your new go-to skirt! For a fun “Boutique-Style-Look” try using different fabrics for the yoke and the skirt panels!
Let’s start with The Playground Skirt!
MATERIALS
1/3 yard fabric for yoke
1 yard fabric for skirt
2/3 yard of 3/4”-wide nonroll elastic
CUTTING INSTRUCTIONSFirst cut the rectangles for the Skirt and Ruffle.
Before you begin constructing a “Playground Skirt” you should have cut:
-Two Skirt Panels
-Two Yoke Pieces
-One piece of elastic that measures two inches smaller than your child’s waist.
CONSTRUCTION
1. Place the two yoke pieces right sides together and sew along the short sides, using a 1/2” seam allowance. Finish the seams and press.
2. Next, you will sew together your skirt panels! Simply match the side edges of the skirt back to the skirt front, right sides together. Pin and sew along one side with a 1/2” seam allowance. Finish the side seam in your preferred method, and set aside. *I finish my seams with a serger, this is not necessary! Other options for finishing your seams are to use an inexpensive pair of pinking shears and simply cut along the raw edge, or to sew over the raw edge with a tight zig-zag stitch, so the right hand swing of the needle falls JUST off the edge.
3. Hem the skirt by pressing under the bottom edge 1/4” to the wrong side and then another 1/4”. Stitch close to the inner folded edge with a short, straight stitch.
4. Sew gathering stitches to the skirt’s top edge using the method of your choice. (Read more about gathering fabric, here) Match the ruffle’s gathered edge to the yoke’s bottom edge (right sides facing) and gather to fit, securing in place with pins.
5. Sew the yoke to the skirt panels with a 1/2” seam allowance. Finish and press the seam toward the skirt. Topstitch right above the seam along the yoke’s bottom edge to hold the seam allowance in place.
6. To create your waistband, start by folding the top edge of the skirt 1/4” to the wrong side of the fabric and press. Next fold the edge another 1” again to the wrong side of the fabric, and press again. With the skirt wrong side out, stitch close to the bottom edge of the waistband all the way around, leaving a 1” opening at the center of the back (to slip in your elastic). Be sure to backstitch at the beginning and end of your stitching.
7. Attach a safety pin to one end of the elastic and guide it through the waistband casing. Once you get back to the opening, remove the safety pin and sew the elastic ends together to make a loop. Overlap the elastic ends 1/2” and use a zigzag stitch to secure them.
8. To finish,stitch the waistband gap closed. Use care to not stitch through the elastic.
TO MAKE THE FARMER’S MARKET SKIRT (A Twirl Skirt Variation)
You will need an additional 3/8 yard fabric for the Apron, plus any embellishments of your choice.
APRON CUTTING GUIDELINES
To create this fun skirt, begin by cutting out the materials outlined in the Playground Skirt tutorial above.
You will start assembling your skirt by following steps 1 through 4 as outlined above.
From there, you will need to finish the sides and bottom of the apron by pressing under 1/4” and then another 1/4” and stitching close to the inner folded edge around all three sides.
Next, sew gathering stitches to the apron’s top edge.
Measure over 3” from each side of the yoke’s bottom edge and mark the spots with pins. Match the apron to the pins, then right sides facing baste to attach the apron to the yoke with a narrow, 1/4” seam allowance.
From here, match the gathered edge of the lower skirt panel to the yoke’s bottom edge (with the apron attached) and continue following steps 5 through 8 as outlined above. Make sure the apron is tucked in between the yoke and the skirt panels.
Two sweet looks from one quick tutorial. So fun, right?
The apron attachment provides a great opportunity for adding embellishments to a simple twirl skirt. Outline the apron in ricrac or lace, add an applique, or personalize the skirt with hand embroidery. The options are endless! Happy Creating!
This tutorial is for personal use only. Please do not sell pieces created with this tutorial for profit.
Please DO use this tutorial and make sweet skirts for your favorite girls!
If you use this tutorial to create skirts for your girl - I would LOVE to feature YOU on the blog!
Please share a picture on the DB Facebook Page or #daydreambelieversdesigns on Insta & Twitter
Introducing,
*and*
This pattern will soon be your new go-to skirt! For a fun “Boutique-Style-Look” try using different fabrics for the yoke and the skirt panels!
Let’s start with The Playground Skirt!
MATERIALS
1/3 yard fabric for yoke
1 yard fabric for skirt
2/3 yard of 3/4”-wide nonroll elastic
CUTTING INSTRUCTIONSFirst cut the rectangles for the Skirt and Ruffle.
| SIZE | 2 | 3 | 4 | 5 | 6 | 7 | 8 |
| SKIRT PANELS (Cut 2) | 7” L x 26” W | 8” L x 26.5” W | 9” L x 27” W | 11” L x 28” W | 13” L x 29” W | 15” L x 30” W | 17” L x 31” W |
| Yoke (Cut 2) | 3” x 15” | 3” x 15.5” | 4.5” x 16” | 5” x 16” | 5.5” x 16” | 6” x 16.5” | 6.5” x 17” |
Before you begin constructing a “Playground Skirt” you should have cut:
-Two Skirt Panels
-Two Yoke Pieces
-One piece of elastic that measures two inches smaller than your child’s waist.
CONSTRUCTION
1. Place the two yoke pieces right sides together and sew along the short sides, using a 1/2” seam allowance. Finish the seams and press.
2. Next, you will sew together your skirt panels! Simply match the side edges of the skirt back to the skirt front, right sides together. Pin and sew along one side with a 1/2” seam allowance. Finish the side seam in your preferred method, and set aside. *I finish my seams with a serger, this is not necessary! Other options for finishing your seams are to use an inexpensive pair of pinking shears and simply cut along the raw edge, or to sew over the raw edge with a tight zig-zag stitch, so the right hand swing of the needle falls JUST off the edge.
3. Hem the skirt by pressing under the bottom edge 1/4” to the wrong side and then another 1/4”. Stitch close to the inner folded edge with a short, straight stitch.
4. Sew gathering stitches to the skirt’s top edge using the method of your choice. (Read more about gathering fabric, here) Match the ruffle’s gathered edge to the yoke’s bottom edge (right sides facing) and gather to fit, securing in place with pins.
5. Sew the yoke to the skirt panels with a 1/2” seam allowance. Finish and press the seam toward the skirt. Topstitch right above the seam along the yoke’s bottom edge to hold the seam allowance in place.
6. To create your waistband, start by folding the top edge of the skirt 1/4” to the wrong side of the fabric and press. Next fold the edge another 1” again to the wrong side of the fabric, and press again. With the skirt wrong side out, stitch close to the bottom edge of the waistband all the way around, leaving a 1” opening at the center of the back (to slip in your elastic). Be sure to backstitch at the beginning and end of your stitching.
7. Attach a safety pin to one end of the elastic and guide it through the waistband casing. Once you get back to the opening, remove the safety pin and sew the elastic ends together to make a loop. Overlap the elastic ends 1/2” and use a zigzag stitch to secure them.
8. To finish,stitch the waistband gap closed. Use care to not stitch through the elastic.
TO MAKE THE FARMER’S MARKET SKIRT (A Twirl Skirt Variation)
You will need an additional 3/8 yard fabric for the Apron, plus any embellishments of your choice.
APRON CUTTING GUIDELINES
| Size | 2 | 3 | 4 | 5 | 6 | 7 | 8 |
| Apron (Cut 1) | 5” x 14.5” | 6” x 15” | 7” x 15.5” | 9” x 15.5” | 10” x 16” | 11” x 16.5” | 12” x 17” |
To create this fun skirt, begin by cutting out the materials outlined in the Playground Skirt tutorial above.
You will start assembling your skirt by following steps 1 through 4 as outlined above.
From there, you will need to finish the sides and bottom of the apron by pressing under 1/4” and then another 1/4” and stitching close to the inner folded edge around all three sides.
Next, sew gathering stitches to the apron’s top edge.
Measure over 3” from each side of the yoke’s bottom edge and mark the spots with pins. Match the apron to the pins, then right sides facing baste to attach the apron to the yoke with a narrow, 1/4” seam allowance.
From here, match the gathered edge of the lower skirt panel to the yoke’s bottom edge (with the apron attached) and continue following steps 5 through 8 as outlined above. Make sure the apron is tucked in between the yoke and the skirt panels.
Two sweet looks from one quick tutorial. So fun, right?
The apron attachment provides a great opportunity for adding embellishments to a simple twirl skirt. Outline the apron in ricrac or lace, add an applique, or personalize the skirt with hand embroidery. The options are endless! Happy Creating!
This tutorial is for personal use only. Please do not sell pieces created with this tutorial for profit.
Please DO use this tutorial and make sweet skirts for your favorite girls!
If you use this tutorial to create skirts for your girl - I would LOVE to feature YOU on the blog!
Please share a picture on the DB Facebook Page or #daydreambelieversdesigns on Insta & Twitter
TUTORIAL diy the lemonade stand skirt
It’s Spring Skirt Week - Yay! I have SIX great, EASY tutorials to guide you through creating a handcrafted wardrobe for Spring. Let’s jump right in!
Today’s skirt is The Lemonade Stand Skirt
Featuring a classic silhouette, fun ruffle trim, and a pocket for carrying around her treasures!
MATERIALS
1/2 yard fabric for skirt panel
1/3 yard fabric for ruffle and pocket
2/3 yard of 3/4”-wide nonroll elastic
CUTTING INSTRUCTIONS
First cut the rectangles for the Skirt and Ruffle, then cut the 2 pockets.
| SIZE | 2 | 3 | 4 | 5 | 6 | 7 | 8 |
| SKIRT PANELS (Cut 2) | 10” L x 13” W | 11” L x 13.5” W | 12” L x 14” W | 13” L x 14.5” W | 14” L x 15” W | 15” L x 15.5” W | 16” L x 16.5” W |
| RUFFLE (Cut 2) | 3” x 21” | 3” x 22” | 3” x 23” | 3” x 24” | 3” x 25” | 3” x 26” | 3” x 27” |
To cut the pocket: Start with Two 4”x4” squares, then gently curve the bottom to create a rounded “U” shape.
Like this: Your pocket will be 4” across the top and 4” at the widest point.
Before you begin you should have cut:
-Two Skirt Panels
-Two Ruffle Pieces
-Two Pocket Pieces
-One piece of elastic that measures two inches smaller than your child’s waist.
CONSTRUCTION
1. Place the two pocket pieces right sides together and stitch with a 1/4” seam allowance. Leave a 1” gap on one side for turning.
2. Turn right side out, press, and topstitch the top edge of the pocket 1/4 “ from the top edge.
3. Take one skirt panel, right side up, and measure over 2” from the left side of the skirt panel and 4” down from the top edge. This point will be the placement for the pocket’s left corner. (See photo 3) Measure up 3/4” and place the right edge of the pocket, this will angle your pocket slightly and make it easier for your little lady to reach inside.
4. Pin the pocket to the front skirt panel and sew close to the edge around the pocket’s three sides, leaving the top edge open. Be sure to back-stitch at the beginning and end so that pocket’s opening is reinforced.
5. Next, you will sew together your skirt panels! Simply match the side edges of the skirt back to the skirt front, right sides together. Pin and sew along one side with a 1/2” seam allowance. Finish the side seam in your preferred method, and set aside. *I finish my seams with a serger, this is not necessary! Another options to finish the seam are to use an inexpensive pair of pinking shears and simply cut along the raw edge, or to sew over the raw edge with a tight zig-zag stitch, so the right hand swing of the needle falls JUST off the edge.
6. Now you will create your ruffle! Begin by matching the short edges of the ruffle strips and sewing one short edge from each piece with a 1/2” seam allowance to create one long strip of fabric. Finish the seam.
7. Hem the ruffle strip by pressing under the bottom edge 1/4” to the wrong side and then another 1/4”. Stitch close to the inner folded edge with a short, straight stitch.
8. Sew gathering stitches to the ruffle’s top edge, using the method of your choice. (Read more about gathering fabric, here) Match the ruffle’s gathered edge to the skirt’s bottom edge, gather to fit securing in place with pins.
9. Sew the ruffle strip to the skirt panels with a 1/2” seam allowance.finish and press the seam toward the skirt. Topstitch right above the seam along the skirt’s bottom edge to hold the seam allowance in place.
10. Next, you will finish sewing together your skirt panels. Match the side edges of the skirt back to the skirt front, right sides together and sew with a 1/2” seam allowance. Finish the side seam and press.
11. To create your waistband, start by folding the top edge of the skirt 1/4” to the wrong side of the fabric and press. Next fold the edge another 1” again to the wrong side of the fabric, and press again. With the skirt wrong side out, stitch close to the bottom edge of the waistband all the way around, leaving a 1” opening at the center of the back (to slip in your elastic). Be sure to backstitch at the beginning and end of your stitching.
12. Attach a safety pin to one end of the elastic and guide it through the waistband casing. Once you get back to the opening, remove the safety pin and sew the elastic ends together to make a loop. Overlap the elastic ends 1/2” and use a zigzag stitch to secure them.
13. To finish,stitch the waistband gap closed. Use care to not stitch through the elastic. That’s it!
One sweet skirt ready to wear!
This tutorial is for personal use only. Please do not sell pieces created with this tutorial for profit.
Please DO use this tutorial and make sweet skirts for your favorite girls!
If you use this tutorial to create a skirt - I would LOVE to feature YOU on the blog!
Please share a picture on the DB Facebook Page or #daydreambelieversdesigns on Insta & Twitter
TUTORIAL: DIY FEATHER HEADBAND: anthropologie inspired
Like so many of you, I love Anthropologie. They always manage to curate the most gorgeous collections! Their catalogs are always filled with beautiful, well styled photographs that make me envision myself owning/wearing/gifting almost every lovely piece!
A few months ago I was browsing the Anthropologie website when I came across this headband.
:: Swoon! ::
It was love at first sight! The color, the shape. It had an edge but was still feminine. I just dug it.
I immediately envisioned my Iyla wearing it.
…then I saw the price tag, $288.
Seriously, $288.00. For a headband.
Now I am not normally one to complain about a price. I believe in fair pricing for makers.
But c’mon. This headband was priced about $260 dollars too high (and that’s being generous)
I knew I wouldn’t be able to forget about this headband, and that I would never (ever) pay that kind of money for a headband, especially one for a six year old. So just like that, a DIY challenge was born!
Here’s what I came up with…
I love it. Iyla loves it. And this little sweetie only cost me $5 - gotta love that!
Want to make one? Here’s the scoop:
Supplies: Scrap of leather, 1/4 wide ribbon, strand of beads/stones, craft glue.
First, I cut out a feather shape. Mine is 7” long and 3” at the widest point.
Then, using my rotary cutter, I made small “feather like” cuts into the edges. There wasn’t much strategy here, I just wanted the cuts to replicate the shape of a feather; not too precise.
Once I was happy with the shape of my feather, I positioned it on the ribbon (placing it more on the side of the head, than the top) and glued it in place using E-600 craft glue.
Then, to recreate the look of the original headband, I used E-600 craft glue to attach a single row of craft rhinestones to the center of the feather.
That’s it!
Please DO use this tutorial and make fabulous feather headbands for your favorite girls!
If you use this tutorial to create a headband - I would LOVE to feature YOU on the blog!
Please share a picture on the DB Facebook Page or #daydreambelieversdesigns on Insta & Twitter
Happy Crafting!
WHAT’S HAPPENING AT DAYDREAM BELIEVERS
I hope y’all are having a great week! Here’s a mid-week rundown of what’s happening around here.
- Grab Bag skirts are still available in the shop! 25% off list price - gotta love a good deal!
You can order yours in the Etsy shop, here. Be sure to tell your friends! Remember, for every 5 skirts purchased with your name as the referral, you will receive one FREE! (All the details are outlined in the listing!)
- Addison Tops are still available for pre-order! You can customize your shirt to represent your favorite team!
Get the scoop, here.
- I am SO excited that next week is “Skirts for Spring Week” here at Daydream Believers! Skirts are a wardrobe staple. They also happen to be quick, gratifying, dare I say *easy* projects to sew! I’m sharing my DIY guide to create SIX fabulous skirts for Spring! Here’s a preview of the lineup
What do you think? Pretty fabulous, right? I’m SO excited to share the tutorials with you and to help you create a gorgeous, unique, handcrafted Spring wardrobe for your girl!
Speaking of handcrafted…
- Tomorrow on the blog, I’m sharing my DIY version of this gorgeous ($288!) Anthropolgie Headband.
See you then!
TUTORIAL-DIY LEASH AND DOG BANDANA
This weekend we celebrated the 8 year anniversary of the day we adopted our wonderful dog, Roxy.
We gave Roxy a few presents to commemorate the day - a new leash and reversible bandana.
Roxy is such a wonderful dog. Here she is celebrating on Saturday…
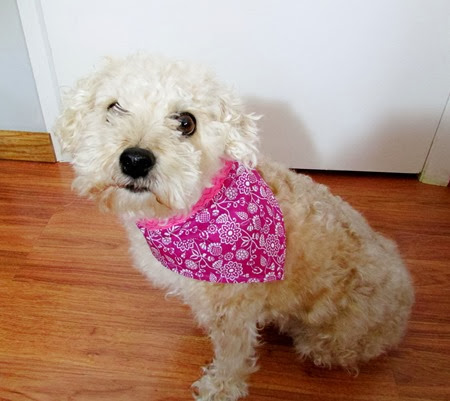
Puppy love at it’s finest!
In celebration of our Roxy girl, I’m sharing how to make a sweet gift set for your favorite pup.
--
Every good pup needs a stylish bandana. Here’s the scoop how to make an over-the-collar style scarf.
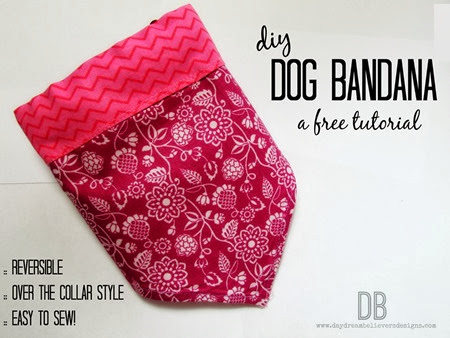
To make one, over the collar bandana - I used two 10x9 in scraps of cotton fabric
*Please note, these are the sizes I used for our 15 lb dog. You will need to adjust for larger or smaller breeds.
: How to make an over the collar dog bandana :
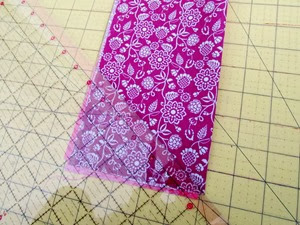
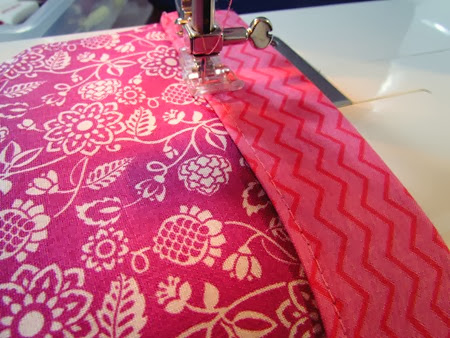
Step One: Stack both 10x9” pieces of fabric, fold the pieces in half lengthwise and press. Mark a point along the raw edges at 4.5” from the bottom. Using a ruler, cut at an angle from the 4.5’ mark to the end of the fold to shape the bandana. Unfold and press.
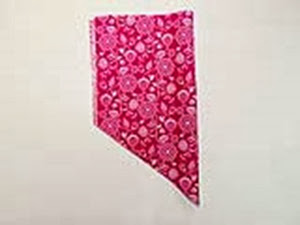
Step Two: With right sides together, stitch around four sides of the fabric, leaving the top side open. Clip your corners, turn right sides out, and press.
Step Three: (Closing the open side) Fold the top of the bandana down 1/4”, press, then fold another 1/4”, press and pin to secure. Now top stitch all around.
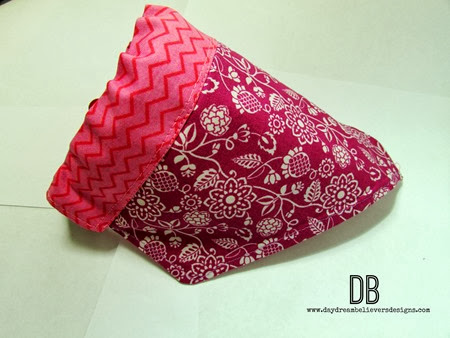
Step Four: (To create the casing) Fold the top of the bandana down and pin in place. You want the fold for the casing to be 1/2” larger than your dog’s collar, to ensure it will fit! My dog’s collar is 1” wide, so I folded the fabric down 1 1/2”. Stitch parallel lines 1/4” from the bottom edge. Go over each stitch for durability.
Step Five: Slide your dog’s collar into the casing and snap it around her adorable (and stylish!) neck.
--
I also made her a leash, but didn’t take any pictures while sewing (oops, bad blogger!)
It is a very easy project and if you have any questions, just ask. Here’s the scoop:
: Supplies :
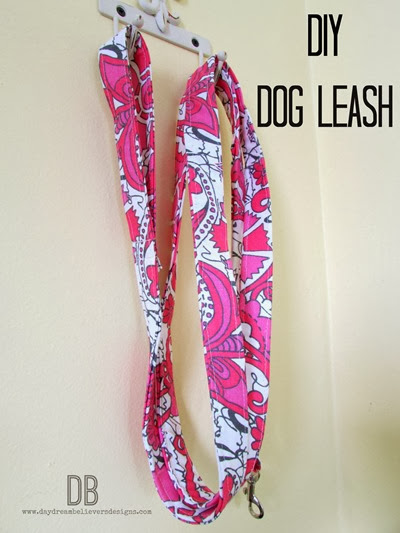
To make one leash - 7 feet of cotton webbing, 1 yard of cotton fabric, 1 metal swivel clip
: How to make a leash :
Step One: Cut two pieces of fabric that measure 42” x 6” - with right sides together, stitch both pieces of fabric along one short end and press the seam open. (This creates one long, six inch wide piece)
Step Two: Fold the short ends 1/4” over to the wrong side of fabric and press. Next fold the entire piece of fabric in half lengthwise (wrong sides together) and press. Open the leash and press the raw edges toward the crease on the wrong side. Fold in half lengthwise again and press. Insert the cotton webbing into the fold and secure with pins.
Step Three: Using a heavy-duty needle, topstitch around the entire piece.
Step Four: To make the loop for the handle, simply fold one end of the leash down 8” and stitch four lines parallel to the short end - going over the stitching at least twice for extra strength.
Step Five: To attach the hardware, thread the other end of the leash through the hook and overlap it on the leash by at least 1”. Stitch four lines parallel to the short end, going over the stitching for extra strength.
SO easy, right? Just think of all the cute leashes you can make your pup! I’m thinking one for every holiday!
--
As with all Daydream Believers tutorials, I am happy to share them for free, for personal use only.
Please do not sell pieces created with this tutorial for profit.
Please DO use this tutorial and make stylish gifts for your favorite pets or as donations for you local shelter.
Ooh and PLEASE send me photos of your creations so I can swoon over the cuteness!
You can link ‘em up, share on the Facebook page, or #daydreambelieversdesigns on Insta & Twitter.
Tell me: Do you have a pet? Dog lover or Cat person?
We gave Roxy a few presents to commemorate the day - a new leash and reversible bandana.
Roxy is such a wonderful dog. Here she is celebrating on Saturday…
Puppy love at it’s finest!
In celebration of our Roxy girl, I’m sharing how to make a sweet gift set for your favorite pup.
--
Every good pup needs a stylish bandana. Here’s the scoop how to make an over-the-collar style scarf.
To make one, over the collar bandana - I used two 10x9 in scraps of cotton fabric
*Please note, these are the sizes I used for our 15 lb dog. You will need to adjust for larger or smaller breeds.
: How to make an over the collar dog bandana :
Step One: Stack both 10x9” pieces of fabric, fold the pieces in half lengthwise and press. Mark a point along the raw edges at 4.5” from the bottom. Using a ruler, cut at an angle from the 4.5’ mark to the end of the fold to shape the bandana. Unfold and press.
Step Two: With right sides together, stitch around four sides of the fabric, leaving the top side open. Clip your corners, turn right sides out, and press.
Step Three: (Closing the open side) Fold the top of the bandana down 1/4”, press, then fold another 1/4”, press and pin to secure. Now top stitch all around.
Step Four: (To create the casing) Fold the top of the bandana down and pin in place. You want the fold for the casing to be 1/2” larger than your dog’s collar, to ensure it will fit! My dog’s collar is 1” wide, so I folded the fabric down 1 1/2”. Stitch parallel lines 1/4” from the bottom edge. Go over each stitch for durability.
Step Five: Slide your dog’s collar into the casing and snap it around her adorable (and stylish!) neck.
--
I also made her a leash, but didn’t take any pictures while sewing (oops, bad blogger!)
It is a very easy project and if you have any questions, just ask. Here’s the scoop:
: Supplies :
To make one leash - 7 feet of cotton webbing, 1 yard of cotton fabric, 1 metal swivel clip
: How to make a leash :
Step One: Cut two pieces of fabric that measure 42” x 6” - with right sides together, stitch both pieces of fabric along one short end and press the seam open. (This creates one long, six inch wide piece)
Step Two: Fold the short ends 1/4” over to the wrong side of fabric and press. Next fold the entire piece of fabric in half lengthwise (wrong sides together) and press. Open the leash and press the raw edges toward the crease on the wrong side. Fold in half lengthwise again and press. Insert the cotton webbing into the fold and secure with pins.
Step Three: Using a heavy-duty needle, topstitch around the entire piece.
Step Four: To make the loop for the handle, simply fold one end of the leash down 8” and stitch four lines parallel to the short end - going over the stitching at least twice for extra strength.
Step Five: To attach the hardware, thread the other end of the leash through the hook and overlap it on the leash by at least 1”. Stitch four lines parallel to the short end, going over the stitching for extra strength.
SO easy, right? Just think of all the cute leashes you can make your pup! I’m thinking one for every holiday!
--
As with all Daydream Believers tutorials, I am happy to share them for free, for personal use only.
Please do not sell pieces created with this tutorial for profit.
Please DO use this tutorial and make stylish gifts for your favorite pets or as donations for you local shelter.
Ooh and PLEASE send me photos of your creations so I can swoon over the cuteness!
You can link ‘em up, share on the Facebook page, or #daydreambelieversdesigns on Insta & Twitter.
Tell me: Do you have a pet? Dog lover or Cat person?
SHOW AND TELL
How was your weekend? Mine was wonderful! Laid back with LOTS of sewing time.
Here’s a peek at what I’ve been creating…
*Mark your calendars, starting March 24th I’m sharing a great collection of tutorials for creating handmade baby gifts!
: Addison Tops : These sweet tops shipped out on Saturday. GO Tigers!
: Doggy Bandanas and Leash : This weekend we celebrated the 8 year anniversary of the day we adopted our wonderful dog, Roxy. We gave her a few gifts to commemorate the day; I made her a new leash and a reversible bandana. Roxy is such a good girl! Here she is wearing her new bandana! SO sweet!
I also made a bandana for my sister’s brand new (SUPER ADORABLE) Goldendoodle puppy, Maggie -
Tomorrow I’m sharing the details on how to create a handmade leash and bandana for your fav pup!
Subscribe to:
Posts (Atom)
